Here's the blog article:
Conquer the Clutter: Your Ultimate Guide to Making Fabric Baskets for Small Items
Ever feel like your countertops and drawers are constantly battling a losing war against clutter? Tiny things like keys, cotton balls, hair ties, and even charging cables seem to multiply overnight, turning your beautifully organized spaces into mini-disaster zones.
But what if I told you there's a simple, stylish, and totally customizable solution? Fabric baskets! These little organizational powerhouses are easy to make, require minimal sewing skills (seriously!), and can instantly transform chaos into calm. Think of them as little fabric hugs for your small items, keeping everything neat, tidy, and within easy reach.
In this guide, I'll walk you through the entire process of creating your own fabric baskets, from choosing the right materials to adding those personal touches that make them trulyyours. So, grab your fabric scraps, dust off that sewing machine (or needle and thread!), and let's get started!
Why Fabric Baskets? More Than Just Cute Storage
Okay, let's be honest. Fabric basketsareundeniably cute. But their appeal goes way beyond aesthetics. Here's why they're a fantastic organizational tool: Customizable: Forget hunting for the "perfect" size basket. You can tailor the dimensions of your fabric baskets to fitexactlywhere you need them – a specific drawer, a narrow shelf, or even the awkward space under your bathroom sink. Budget-Friendly: If you're like me, you have a stash of fabric scraps just waiting to be used. Fabric baskets are a brilliant way to repurpose those leftovers, saving you money and reducing textile waste. Easy to Make: Even if you're a complete beginner at sewing, you can totally pull this off. We'll cover everything step-by-step, with clear instructions and helpful tips. Adds a Personal Touch: Choose fabrics that complement your décor or reflect your personality. These baskets become a functionalanddecorative element in your home. Gentle on Your Belongings:Unlike plastic or wire baskets, fabric baskets are soft and won't scratch delicate items like jewelry or electronics.
Choosing Your Materials: Fabric, Interfacing, and More
The materials you choose will significantly impact the look and durability of your fabric baskets. Here’s a breakdown:
Fabric Choices: Outer Fabric: This is the fabric that everyone will see, so choose something you love! Cotton, linen, canvas, and even quilting cotton are all great options. Consider the weight of the fabric – heavier fabrics will create a sturdier basket. Lining Fabric: This fabric will be on the inside of the basket. A simple cotton or muslin works perfectly. You can even use a contrasting color for a pop of visual interest! Repurposed Fabric:Don't be afraid to get creative! Old jeans, tablecloths, or even curtains can be given a new life as fabric baskets.
The Importance of Interfacing:
Interfacing is your secret weapon for creating baskets that hold their shape. It's a fusible or sew-in fabric that adds stiffness and stability.
Fusible Interfacing: This type is ironed onto the wrong side of your fabric. It's the easiest to use, especially for beginners. I recommend using a medium-weight fusible interfacing for most projects. Sew-In Interfacing: This type is sewn into the seams of your basket. It's a bit more advanced but provides a more professional finish.
Other Essential Supplies: Sewing Machine (or Needle and Thread): A sewing machine will speed up the process, but you can definitely hand-sew these baskets. Scissors or Rotary Cutter: For accurately cutting your fabric. Ruler or Measuring Tape: Essential for precise measurements. Pins or Clips: To hold your fabric pieces together while sewing. Thread: Choose a thread color that matches your fabric. Iron and Ironing Board: For pressing your fabric and fusing the interfacing.
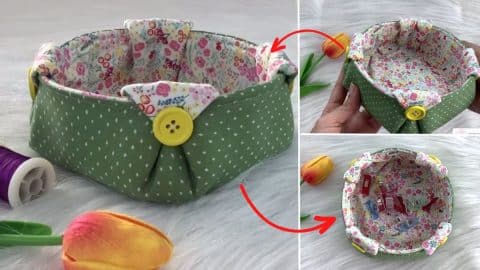
Step-by-Step Guide: Making a Simple Square Fabric Basket
Alright, let's get down to business! This tutorial will guide you through creating a basic square fabric basket. You can easily adapt these instructions to create different shapes and sizes.
1. Cutting Your Fabric:
For a small basket (approximately 5" x 5" x 5"), you'll need:
Two pieces of outer fabric: 12" x 12"
Two pieces of lining fabric: 12" x 12"
Two pieces of interfacing: 12" x 12"
Important Note: These measurements are approximate. Feel free to adjust them to create a basket that fits your specific needs. Remember to add extra for seam allowances (usually ½ inch).
2. Applying the Interfacing:
Iron the fusible interfacing onto the wrong side of each piece of outer fabric. Follow the manufacturer's instructions for your specific type of interfacing. This step is crucial for giving your basket structure.
3. Sewing the Outer Fabric:
Place the two pieces of outer fabric right sides together (meaning the patterned or "good" sides are facing each other).
Pin or clip the edges together.
Sew along three sides, leaving one side open. Use a ½ inch seam allowance.
Clip the corners to reduce bulk when you turn the fabric right side out.
4. Sewing the Lining Fabric:
Repeat the process with the lining fabric: place the two pieces right sides together, pin, and sew along three sides, leaving one side open. Important:Leave a 4-5 inch opening in thebottomof the lining. This opening will be used to turn the basket right side out later.
5. Joining the Outer and Lining Fabrics:
Turn the outer fabric right side out.
Slip the outer fabric baginsidethe lining fabric bag, so the right sides are facing each other. The raw edges of the open sides should be aligned.
Pin or clip the top edges together.
Sew all the way around the top edge, using a ½ inch seam allowance.
6. Turning and Finishing:
Reach inside the opening you left in the lining and pull the entire basket through. This will turn the basket right side out.
Gently push out the corners of the outer fabric.
Hand-stitch the opening in the lining closed. You can use a blind stitch for a neat finish.
Press the top edge of the basket to create a crisp, clean finish.
7. Creating the Boxed Corners:
This is what gives your basket its boxy shape!
Fold the basket so that one of the side seams is aligned with the bottom seam, creating a triangle at the corner.
Measure down from the point of the triangle (the corner) the desired depth of your boxed corner (e.g., 2 inches).
Draw a line across the triangle at your measured point.
Sew along this line.
Trim away the excess fabric, leaving about ½ inch seam allowance.
Repeat this process for all four corners.
You've done it! You now have a cute and functional fabric basket.
Adding Your Personal Touch: Customization Ideas
Now that you've mastered the basic technique, let's explore some ways to customize your fabric baskets: Different Shapes and Sizes: Experiment with different dimensions to create baskets that perfectly fit your needs. Try rectangular, circular, or even triangular baskets! Pockets: Add pockets to the inside or outside of your baskets for even more organization. These are great for holding small items like pens, scissors, or remotes. Handles: Attach fabric handles to your baskets for easy carrying. Appliqués: Add fabric appliqués to the outside of your baskets for a decorative touch. Think flowers, animals, or even your initials. Embroidery: Embroider your baskets with your name, a favorite quote, or a simple design. Ribbon or Lace: Add ribbon or lace trim to the top edge of your baskets for a delicate and feminine look. Fabric Combinations:Mix and match different fabrics to create unique and eye-catching baskets.
People Also Ask: Fabric Basket FAQs
What's the best fabric for a sturdy basket? Canvas, denim, and heavier cotton fabrics are excellent choices for sturdy baskets. Consider using a heavier interfacing as well.
Can I make a no-sew fabric basket? Yes! There are tutorials online for no-sew fabric baskets that use fabric glue or fusible webbing. However, these baskets may not be as durable as sewn baskets.
How do I clean a fabric basket?Most fabric baskets can be hand-washed with mild soap and water. Let them air dry completely.
What can I use instead of interfacing? Thick felt can be used for structure but may not provide the same crispness as interfacing.
Final Thoughts: Embrace the Organized Life
Making fabric baskets is a rewarding and practical way to declutter your home and add a personal touch to your décor. Don't be afraid to experiment with different fabrics, sizes, and embellishments. Start with a simple project and gradually work your way up to more complex designs. Remember, the most important thing is to have fun and create something you love!
Actionable Tip: Before you start cutting fabric, measure the space where you plan to use the basket. This will help you determine the perfect dimensions for your project and avoid creating a basket that's too big or too small. Happy sewing!